When a bug jumps out and surprises me I like to share it so others do not run into the same unexpected result. I don’t think there is any reason for a bug to bite multiple people in the butt. Therefore, I want to show you why persist sample percent IS NOT PERSISTED!
Why should I use Persist Sample Percent?
When your table grows and the rows multiply the default statistics sample percent used by SQL Server gets smaller and smaller. In theory, persist sample percent lets you update your statistic once specifying the percent it should use going forward when a sample percent is not specified. Unfortunately, this feature is broken, IMHO.
Persist Sample Percent Setup
To set up the scene so you can reproduce and learn. Below we create a single-column table that is an identity and also primary key. Therefore, an index is created which also will create statistics on our column.
DROP TABLE dbo.Test
CREATE TABLE dbo.Test (ID INT IDENTITY NOT NULL CONSTRAINT TestPK PRIMARY KEY);

 INSERT INTO dbo.Test DEFAULT VALUES
 GO 10000000 --100 million rows..

	CREATE PROCEDURE dbo.DemoStatsReview
	AS BEGIN
	SELECT CAST(((rows_sampled * 1.00)/ [rows] )*100.00 AS NUMERIC(5,2)) AS SamplePCT,
	sp.*
	FROM sys.stats AS s
	OUTER APPLY sys.dm_db_stats_properties (s.[object_id], s.stats_id) AS sp
	WHERE s.[name] = N'TestPK';
	END
First, we will rebuild our index utilizing a fullscan. This is expected and normal activity for an index rebuild.
/* Index Rebuild uses 100% rows for sampling */
ALTER INDEX TestPK ON dbo.Test REBUILD WITH (STATISTICS_NORECOMPUTE = OFF)
EXEC dbo.DemoStatsReview
Now, we will update statistics utilizing the new Persist Sample Percent feature. This should give us two benefits. One, auto stats updates will use this sample rate going forward on this statistic. Two, we no longer need to supply an sample percent if we update statistics manually or with our maintenance jobs.
/* Now lets update stats by using the PERSIST_SAMPLE_PERCENT */
UPDATE STATISTICS dbo.Test TestPK WITH SAMPLE 60 PERCENT, PERSIST_SAMPLE_PERCENT = ON;
EXEC dbo.DemoStatsReview
We now have persisted sample percent to 60%. Now that we set it. We can forget it, right??
Let’s go ahead and update statistics now without any sample percent specified. We will see that the persist sample percent is applied as expected.
/* Update stats to validate sample size is persisted */
UPDATE STATISTICS dbo.Test TestPK
EXEC dbo.DemoStatsReview
Persist Sample Percent holds and the sample percent at 60%
Let’s see what happens when we rebuild the index. We expect that a FULLSCAN is used to update the statistics behind the index. Did anything else change? OH THE SUSPENSE!
/* What happens if we rebuild an index that has its stats persisted?
Do we still use 100% rows for sample? */

ALTER INDEX TestPK ON dbo.Test REBUILD WITH (STATISTICS_NORECOMPUTE = OFF)
EXEC dbo.DemoStatsReview
BOOM! Persisted Sample Percent is reset to ZERO on a Index Rebuild
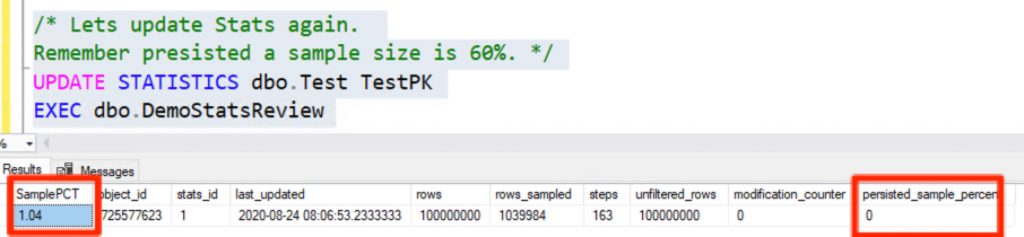
/* Lets update Stats again.
Remember presisted a sample size is 60%. */
UPDATE STATISTICS dbo.Test TestPK
EXEC dbo.DemoStatsReview
We went from our desired 60% sample rate to 1%. This sample rate will only get lower as your data grows!
There you have it. The persist sample percent not only went away on the Index Rebuild but because we updated statistics without forcing a sample percent on 100 million rows the sample percent went to 1%. I will add another blog post that focuses on this later. For now, if the late Notorious BIG was a DBA he would say, “More rows,more problems with stats you get!” If this didn’t make any sense. The more row the lower there sample rate when statistics get updated.
How do we fix this?
This is a bug inside of SQL Server. There is a feedback item that hasn’t received any feedback from Microsoft in two years since the bug was reported. Please upvote so this can get the focus of Microsoft so persist sample percent is actually persisted!
I am a consultant in Austin who can help make your data go fast, be secure and highly available. When I am engaged in a performance tuning project priority #1 isn’t to make sure your data go faster. Priority #1 is to make sure we get the same result sets while making your data go faster.
Free SQL Data Compare with T-SQL?
There are several tools out there that can be used to compare data. Today, I want to share how you can quickly do this on your own with T-SQL!
Let’s simplify the process. Our goal is to check two temp tables and validate if any of the data is different. This would include inserts, updates, and deletes. For this example, I will just do a dump of Sales.SalesOrderDetail in AdventureWorks into two temp tables as shown below.
SELECT *
INTO #Tmp1
FROM Sales.SalesOrderDetail

SELECT *
INTO #Tmp2
FROM Sales.SalesOrderDetail
Now we shouldn’t see any differences since we used the same table to create both temp tables. We are going to use two different SQL operators to compare these two temp tables while applying some data changes. We will focus on the UNION ALL and EXCEPT operators.
The Power of EXCEPT
Except is an underrated and underused SQL operation. In a nutshell, it will give you the results of the first query that are different from the next query. So, if the data of any column in #tmp1 is different from #tmp2 or if the row doesn’t exist in #tmp2 but is in #tmp1 it will get returned.
SELECT * FROM #Tmp1
EXCEPT
SELECT * FROM #Tmp2
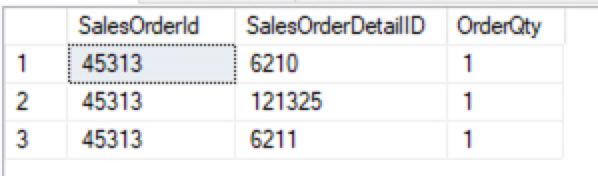
Let’s go ahead and modify a column in #Tmp1 so you can see how this works. We are going to set OrderQty to five when SalesOrderId is 45313 and SalesOrderDetailId is 6210. This will change just one column in one row. We will then select these columns from both temp tables to see the change.
This is how most people would start using T-SQL to identify changes in data.
UPDATE #Tmp1 SET OrderQty = 5
WHERE SalesOrderID = 45313
AND SalesOrderDetailID  = 6210

SELECT SalesOrderId, SalesOrderDetailID,
OrderQty FROM #Tmp1
WHERE SalesOrderID = 45313
AND SalesOrderDetailID = 6210

SELECT SalesOrderId, SalesOrderDetailID,
OrderQty FROM #Tmp2
WHERE SalesOrderID = 45313
AND SalesOrderDetailID = 6210
Data Compare is easy when we know what changed. Data Compare is easy when we know what changed and not much changed. Just select it..
Finding Data Changes The Easy Way
Selecting the two tables is easy if we know what change occurred and there aren’t many changes. This can get complicated quickly. Therefore, if we just want to quickly know if we have differences lets take a look at my goto method using EXCEPT. To make this example easier to read instead of using “SELECT *” I will just focus on columns that are changing. In a real example, I would want to know if any columns changed.
SELECT SalesOrderId, SalesOrderDetailID, OrderQty
FROM #Tmp1
EXCEPT
SELECT SalesOrderId, SalesOrderDetailID, OrderQty
FROM #Tmp2
Data Compare using EXCEPT quickly lets us see that we had a data change
If an insert or a column change occurs in #tmp1 we will see it in our EXCEPT SQL statement. This isn’t true if the change is only in #tmp2.
For example, an insert in #tmp2 or delete in #tmp1 would not be shown. To see this we would have to switch the temp tables in the EXCEPT clause as shown below.
INSERT INTO #tmp2 (SalesOrderId, ProductID,
SpecialOfferID, OrderQty, UnitPrice,
UnitPriceDiscount,LineTotal,
rowguid, ModifiedDate)
VALUES (45313, 1, 3, 1,1.25,0,
1.25*1, NEWID(), GETDATE())

DELETE FROM #Tmp1
WHERE SalesOrderID = 45313
AND SalesOrderDetailID = 6211

SELECT SalesOrderId, SalesOrderDetailID, OrderQty
FROM #Tmp1
EXCEPT
SELECT SalesOrderId, SalesOrderDetailID, OrderQty
FROM #Tmp2
/* We will now see our insert and delete */
SELECT SalesOrderId, SalesOrderDetailID, OrderQty
FROM #Tmp2
EXCEPT
SELECT SalesOrderId, SalesOrderDetailID, OrderQty
FROM #Tmp1
Our first EXEMPT clause only shows the update that occurred in #tmp1. The delete in #tmp1 and insert in #tmp2 cannot be seen because the data doesn’t exist in #tmp1.
Our Second EXEMPT shows the insert in #tmp2, delete in #tmp1 and update on #tmp1 because the column is different on #tmp2
Our first except shows us data in #tmp1 that is not in #tmp2 because the OrderQty column changed in #tmp1. The second EXCEPT shows us data in #tmp2 that isn’t in #tmp1 because of our insert into #tmp2 and also our delete from #tmp1 would be found in #tmp2 but not #tmp1.
UNION ALL for the Win!
To wrap this up now we can include a UNION ALL operation between the two EXCEPT operations. This would get us any data changes to the columns selected from the temp tables.
SELECT SalesOrderId, SalesOrderDetailID, OrderQty
FROM #Tmp1
EXCEPT
SELECT SalesOrderId, SalesOrderDetailID, OrderQty
FROM #Tmp2
UNION ALL
SELECT SalesOrderId, SalesOrderDetailID, OrderQty
FROM #Tmp2
EXCEPT
SELECT SalesOrderId, SalesOrderDetailID, OrderQty
FROM #Tmp1
UNION ALL and EXCEPT for the free Data Compare Win! Quickly shows rows that are different between the two tables.
Typically, I need to verify is the data before and after is the same. This is a quick and easy way to get that answer. Now I know you might want to take this to the next level. You might be thinking how do I just get the unique key for the table and columns that changed. I will leave that as an exercise for you.
UPDATE: 3/16/2020 The first script below was updated from setting QDS to “Read_Write” instead of “Read_Only”. Martin thank you for pointing this out in your comment below.
This month’s T-SQL Tuesday is hosted by Tracy Boggiano. Tracy invites us all to write about adopting Query Store. Today, I wanted to share my favorite but a very unique way I use the Query Store for Workload Replays.
You can read more about the invite in detail by clicking on the T-SQL Tuesday logo in this post.
Today, I wanted to talk about my least favorite part of replaying workloads. It’s having an extended event or server-side trace running during a workload replay only so we can compare the results at a query-level when the replay is finished. Now, this might seem like a trivial thing but when you have workloads over 10k batch requests/sec this can consume terabytes of data quickly. The worst part is waiting to read all the data, slice and dice the data for analysis.
Starting with SQL Server 2016 there is a better and faster way to go! You can replace your extended event or server-side trace with Query Store captured data. Today, I will show you how to use the Query Store for the same purpose.
Different Settings
Keep in mind our goal here is very different from the typical use case for using the Query Store. We want to capture metrics for all the queries executed during a workload replay. Nothing more and nothing less.
If we have the runtime results for multiple replays we can then easily compare the workload performance between the workload replays.
Most of our changes from the regular Query Store best practices are shown below:
Max Size (MB) – Need to make sure there is enough space to capture your whole workload. This size will vary by how much workload is being replayed.
Query Store Capture Mode set to All. Normally, not ideal, but remember we want to capture metrics for our whole workload being replayed.
Size Based Cleanup Mode set Off – Yup, we don’t want to lose our workload data that is capture until we persist in our ideal form. More on this later.
The Capture Process
Now, this is where you would use Database Experimentation Assistant (DEA), Distributed Replay or some other process to replay your consistent workload in an isolated non-production environment. This subject we will cover in another future post. For now, we will just have two replays called “Baseline” and “Change”. This simulates a baseline replay with no schema changes and then another change replay with a change introduced in the schema.
To capture our workload we just enable the Query store with our settings mentioned above and also clear out the query store right before our workload replay starts to help ensure we are just capturing our workload.
USE [master]
GO
ALTER DATABASE [YourDatabase] SET QUERY_STORE = ON
GO
ALTER DATABASE [YourDatabase]
SET QUERY_STORE (OPERATION_MODE = READ_WRITE,
 MAX_STORAGE_SIZE_MB = 10000,
 QUERY_CAPTURE_MODE = AUTO,
 SIZE_BASED_CLEANUP_MODE = OFF)
GO
ALTER DATABASE [YourDatabase] SET QUERY_STORE CLEAR
GO
Stop Capturing Query Store Data
Once your replay is finished we will want to disable the query store from writing data into the query store. We want the least amount of non-workload data inside of the Query Store when we are using it for the sole purpose of comparing workloads.
USE [master]
GO
ALTER DATABASE [YourDatabase]
SET QUERY_STORE (OPERATION_MODE = READ_ONLY)
GO
Prepare Query Store Data for Long-Term Analysis
Now for smaller workloads, one might be happy with utilizing DBCC CLONEDATABASE to have a schema-copy of their workload with Query Store data persisted. This is perfectly fine. With bigger workloads being captured I have noticed there are ways to improve the performance of query store when doing analysis of the query store data. For example, clustered columnstore indexes can be very helpful for performance and compacity. Therefore, I like to have a schema for each replay and import the data. The following is a quick example of setting up a schema for a “baseline” replay and a “change” replay.
CREATE DATABASE [DBA]
GO
use [DBA]
GO
CREATE SCHEMA Baseline;
GO
CREATE SCHEMA Compare;
GO
Next, we will import our captured data from our baseline replay that’s in our read-only query store database. I also like to have a baked-in aggregate of metrics for reads, writes, duration and CPU at the query level.
use [YourDatabase]
GO
/* Load Data */
SELECT * INTO DBA.Baseline.query_store_runtime_stats
FROM sys.query_store_runtime_stats;

SELECT * INTO DBA.Baseline.query_store_runtime_stats_interval
from sys.query_store_runtime_stats_interval;

select * INTO DBA.Baseline.query_store_plan
from sys.query_store_plan;

select * INTO DBA.Baseline.query_store_query
from sys.query_store_query;

select * INTO DBA.Baseline.query_store_query_text
from sys.query_store_query_text;
/* Addition for SQL 2017 */
select * INTO DBA.Baseline.query_store_wait_stats
 from sys.query_store_wait_stats

use [DBA]
GO

SELECT SUM(Count_executions) AS TotalExecutions,
SUM(Count_executions*avg_duration) AS TotalDuration,
SUM(Count_executions*avg_logical_io_reads) AS TotalReads,
SUM(Count_executions*avg_logical_io_writes) AS TotalWrites,
SUM(count_executions*avg_cpu_time) AS TotalCPU,
query_hash
INTO Baseline.QueryResults
FROM Baseline.query_store_runtime_stats rs
JOIN Baseline.query_store_plan p ON rs.plan_id = p.plan_id
JOIN Baseline.query_store_query q ON p.query_id = q.query_id
GROUP BY q.query_hash
Next, we would reset the database to our starting position and add our query store settings as mentioned above in this blog post and replay or workload again. This time, we would dump our data into the “change” schema
use [YourDatabase]
GO
/* Load Data */
SELECT * INTO DBA.Compare.query_store_runtime_stats
FROM sys.query_store_runtime_stats;

SELECT * INTO DBA.Compare.query_store_runtime_stats_interval
from sys.query_store_runtime_stats_interval;

select * INTO DBA.Compare.query_store_plan
from sys.query_store_plan;

select * INTO DBA.Compare.query_store_query
from sys.query_store_query;

select * INTO DBA.Compare.query_store_query_text
from sys.query_store_query_text;

select * INTO DBA.Compare.query_store_wait_stats
 from sys.query_store_wait_stats

use [DBA]
GO

SELECT SUM(Count_executions) AS TotalExecutions,
SUM(Count_executions*avg_duration) AS TotalDuration,
SUM(Count_executions*avg_logical_io_reads) AS TotalReads,
SUM(Count_executions*avg_logical_io_writes) AS TotalWrites,
SUM(count_executions*avg_cpu_time) AS TotalCPU,
query_hash
INTO Compare.QueryResults
FROM Compare.query_store_runtime_stats rs
JOIN Compare.query_store_plan p ON rs.plan_id = p.plan_id
JOIN Compare.query_store_query q ON p.query_id = q.query_id
GROUP BY q.query_hash
Comparing Workload Results
Now that we have our two workloads imported we can now compare to see how the workload changed per query. I will break this down into two quick steps. First, get deltas per query. Second, get totals for how many times a query might be different in the query store. More on this a little later in the post.
/* Query Store Results */
use [DBA]
GO

SELECT DISTINCT
c.TotalExecutions - b.TotalExecutions AS ExecutionDelta,
c.TotalExecutions AS CompareExecutions,
b.TotalExecutions AS BaselineExecutions,
c.TotalDuration - b.TotalDuration AS DurationDelta,
c.TotalCPU - b.TotalCPU AS CPUDelta,
c.TotalReads - b.TotalReads AS ReadDelta,
c.TotalWrites - b.TotalWrites AS WriteDelta,
c.TotalReads AS CompareReads,
b.TotalReads AS BaselineReads,
c.TotalCPU AS CompareCPU,
b.TotalCPU AS BaselineCPU,
c.TotalDuration AS CompareDuration,
b.TotalDuration AS BaselineDuration,
c.query_hash
--q.query_sql_text
INTO #CTE
FROM Baseline.QueryResults b
JOIN Compare.QueryResults c ON b.query_hash = c.query_hash


select COUNT(query_sql_text) AS QueryCount,
MAX(query_sql_text) query_sql_text,
MIN(query_id) MinQueryID,
qsq.query_hash
INTO #Compare
from Compare.query_store_query qsq
JOIN Compare.query_store_query_text q
	ON qsq.query_text_id = q.query_text_id
where qsq.is_internal_query = 0
GROUP BY query_hash

select COUNT(query_sql_text) AS QueryCount,
MAX(query_sql_text) query_sql_text,
MIN(query_id) MinQueryID,
qsq.query_hash
INTO #Baseline
from Baseline.query_store_query qsq
JOIN Baseline.query_store_query_text q
	ON qsq.query_text_id = q.query_text_id
where qsq.is_internal_query = 0
GROUP BY query_hash

select cte.*
, a.QueryCount AS Compare_QueryCount
, b.QueryCount AS Baseline_QueryCount
, a.MinQueryID AS Compare_MinQueryID
, b.MinQueryID AS Baseline_MinQueryID
, a.query_sql_text
FROM #CTE cte
JOIN #Compare a on cte.query_hash = a.query_hash
JOIN #Baseline b on cte.query_hash = b.query_hash
WHERE 1=1
AND ExecutionDelta = 0
ORDER BY ReadDelta ASC
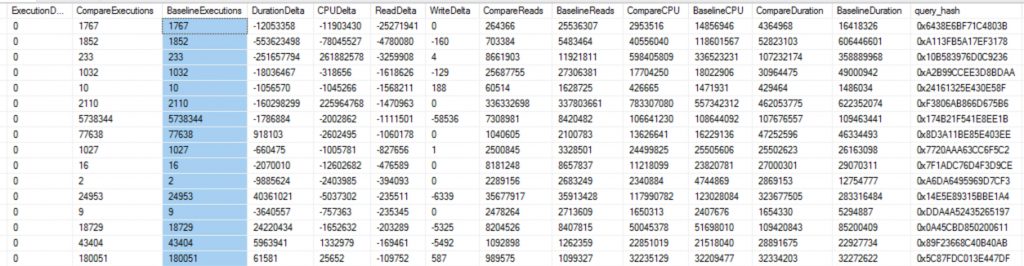
Query Store for Workload Replays
Workload Replays compared down to the query execution level is priceless!
Lessons Learned Along the Way!
Initially, working with the query store I thought query_id was going to be my best friend. I quickly learned that my old friend query_hash is more helpful for multiple reasons. One, I can easily compare queries between different replays. That’s right now all workload replays get you the same query_id even when the workload is the exact same being replayed. Two, I can compare them with different databases as well. Finally, query_hash is very helpful with ad-hoc workloads as I can aggregate all the different query_ids that have the same query hash.
I recently spoke at a conference and was asked what is the easiest way to import databases to Azure SQL Database. Therefore, I wanted to share how I do this with DBATools.io. You can use the same code to just export if you need a local copy of an Azure SQL database as well.
Import-Module dbatools -Force
<# Variables #>
$BackupPath = "C:\Demo\AzureSQL\Bacpac" #folder location for backups
$SourceInstance = "sql2019\sql2016"
$DBName = "AdventureWorksLT2012"
$AzureDestInstance = "procuresqlsc.database.windows.net"
$DBNameDest = $DBName

<# backpac options for import and export #>
$option = New-DbaDacOption -Type Bacpac -Action Export
$option.CommandTimeout = 0

$option2 = New-DbaDacOption -Type Bacpac -Action Publish
$option2.CommandTimeout = 0

<#
The following assums Azure SQL Database exists and is empty
Azure will create database by default if it doesn't exist
#>
$bacpac = Export-DbaDacPackage -Type Bacpac -DacOption $option -Path `
$BackupPath -SqlInstance $SourceInstance -Database $DBName
Publish-DbaDacPackage -Type Bacpac -SqlInstance `
$AzureDestInstance -Database $DBNameDest -Path $bacpac.path `
 -DacOption $option2 -SqlCredential username
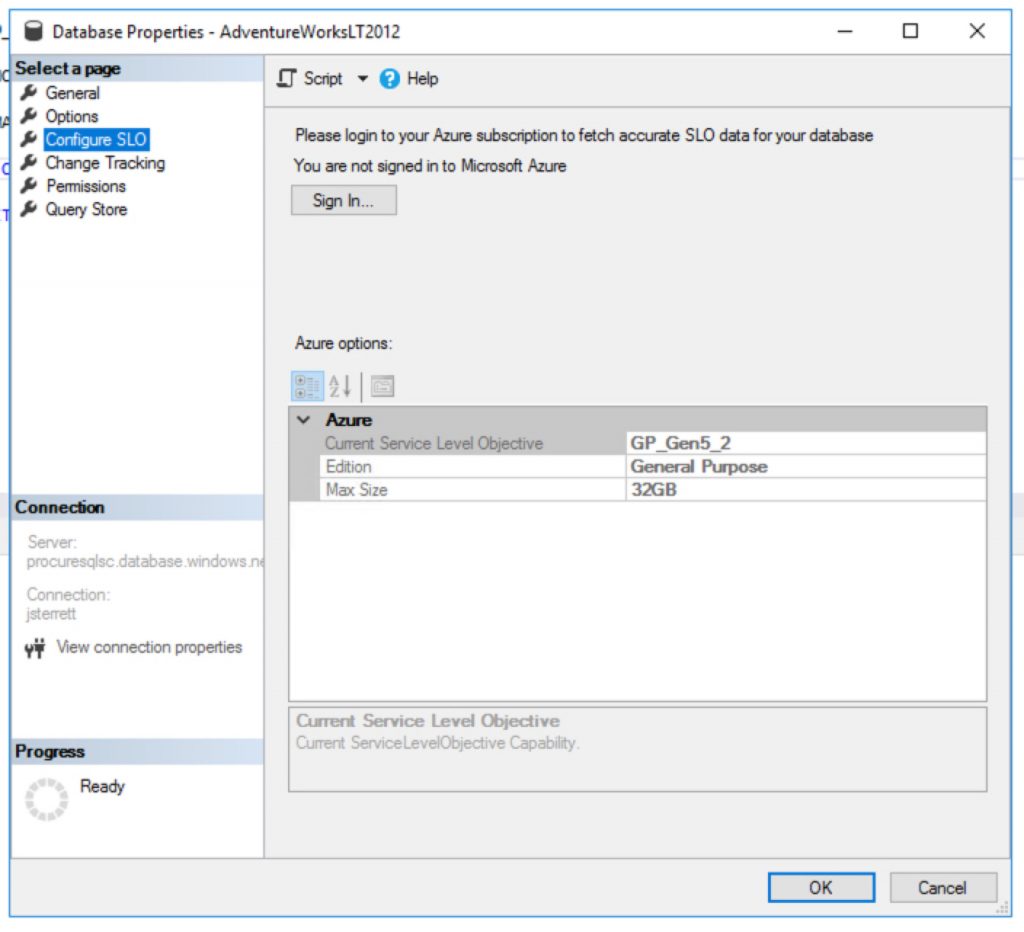
What Is my Performance Tier?
Great question, as of 3/3/2020 if the database in Azure SQL Database does not exist then it will be created. When its created the following database uses the default performance tier. This is General Purpose (Gen5) with 2 vCores.
The default cost of a new Azure SQL Database is 371.87 per month.
How to create cheaper databases
Great question, you can import databases to Azure SQL Database cheaper using PowerShell. It is as simple as using the Azure PowerShell Module. The following example below I use my existing Azure SQL Database server and I end up creating a new database with the “S0” tier.
You got all the nuts and bolts to generate a script that can migrate all your databases on an instance. Then you can import databases to Azure SQL Database in one loop.
Today I wanted to cover how you can grant the least privilege required to stop, start or restart an Azure VM. This is also a fun great example of how you can create custom Azure Security Roles too. That’s right, we are killing two birds with one stone today.
Why Should you create a custom Role?
Where possible I like to grant security towards resource groups. Therefore, let’s assume we got multiple VM’s built for the developer group to do some testing. You want to grant people access to start, restart or stop any VM in that group. We can then grant access to the resource group to our custom role. As VMs come in and out of the resource group they would inherit our custom group.
Now, you might be wondering why don’t I just give them the “Contributor” role or the “Virtual Machine Contributor” role and be on our way? Well, if you were to do this on a resource group you just gave access to create VM’s and a whole lot more.
Least privileged roles are your best friend. Today, you will see they are also not that hard to create either.
How do we create custom roles?
Great question, first you need to identify what tasks do we need the role to complete. In our case, you have to be able to see a VM in order to take any action against the VM. Then we want to start, stop (deallocate) and restart the VM. Digging through IAM. I found the following security options.
Now, we can create our custom JSON text file that we will then import using Azure CLI. Below you will find a sample JSON file to build our custom security role. You will need to add your subscription id(s). You can also change your name and description you would see in the Azure Portal.
Now that we are ready to go with our custom security role in a JSON file. We can then utilize Azure CLI to log in to the tenant and import our security role. First, we will log in to Azure with CLI as shown below.
az login --username <myEmailAddress> -t <customerTenantId-or-Domain>
Now we will load our saved JSON file. After a few minutes, we should then see our new security role in the Azure portal.
az role definition create --role-definition IAMRole-VMOperator.json
Now you can grant access to your custom role just like you would with any other role in Azure.
Hello everyone, this is John your Austin SQL Server Consultant here and today I am going to answer a question that comes up often so I wanted to blog about it for everyone. The question of the day is where can I download the previous SQL Server Updates?
The History towards Updates
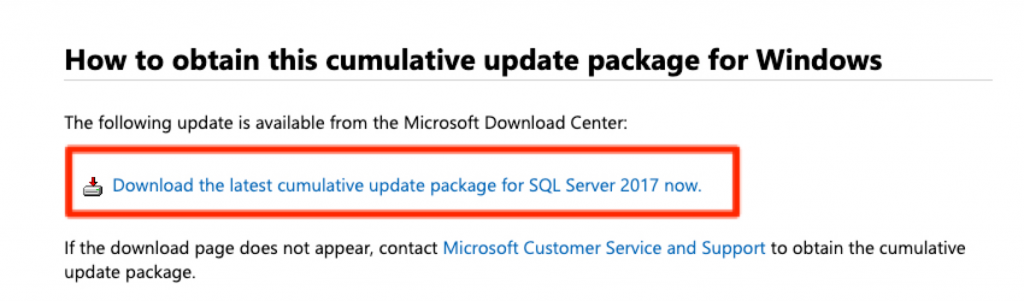
Back in the day when we were young but not a kid anymore there were service packs and cumulative updates. We could download these separately and all of the updates were easy to find. Now today, if you click on a KB article to download an update you get pointed to the latest update as shown below.
How far is My SQL Server on Updates?
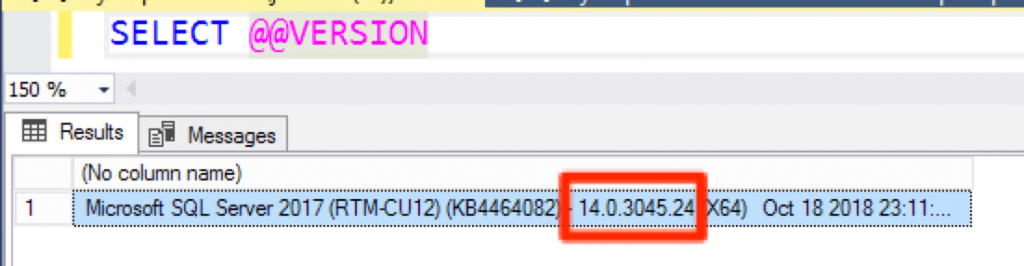
This is also another great question. My favorite place to find all the history of updates toward SQL Server is the SQL Server Build List Blog. You can cross-reference this towards your version by running the following query below.
You can use SELECT @@VERSION to get your current version number.
I fully get exactly why Microsoft is trying to point everyone to the latest update. Normally, it makes perfect sense but let’s take a look at today Jan 9th, 2020. I am planning to update SQL Server 2017 to CU17. Its been out for two months. Today CU18 is released and if I wasn’t careful I would have downloaded a different update than expected.
SQL Server Blog List is a great resource for finding a list of all SQL Server Updates
Getting a previous SQL Server Update
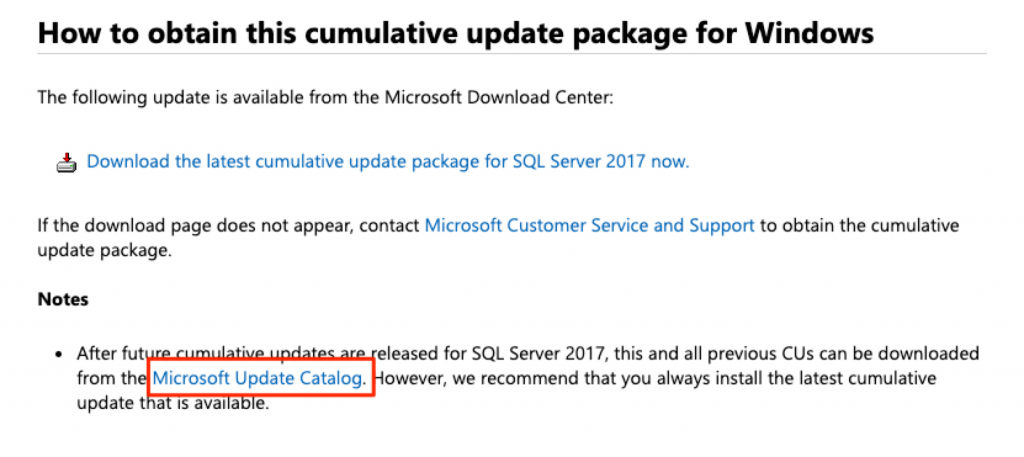
So, on to the solution. It’s actually an easy one but also one that is easy to overlook as well. Let’s go back to the new standard update page for SQL Server updates.
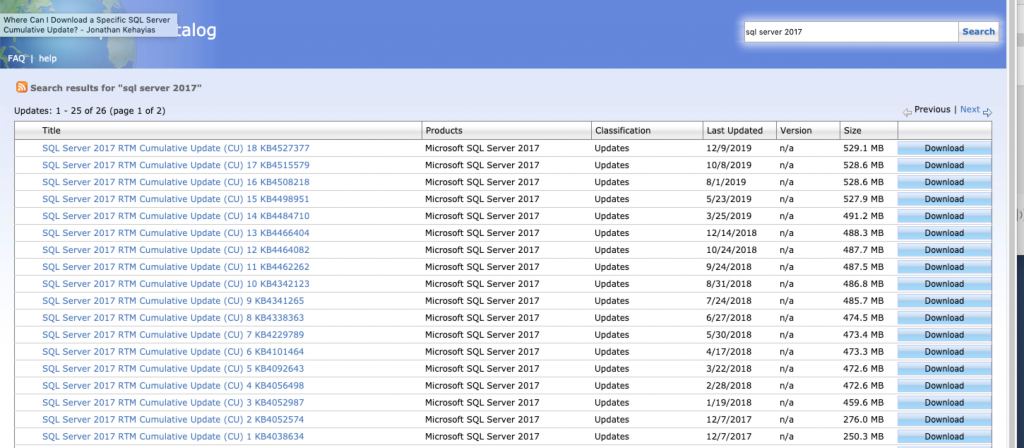
That is right, the Microsoft Update Catalog is your best friend to find all your updates for Microsoft products including SQL Server. You can search for the product you want. For example, in this case, I am looking for SQL Server 2017 and can see all the previous updates for SQL Server.
All the SQL Server Updates can be found in the Microsoft Update Catalog
If you enjoyed this tip and found it helped make sure to join our newsletter so you can enjoy more free tips, tricks, and video demos.
Hello everyone! This is your SQL Server Consultant in Austin, TX and due to some posts on twitter about SQL PASS recordings costing $999 I wanted to share some of my favorite places to find free SQL Server training videos. I hope this helps make your data fast, secure and highly available in 2020 and beyond!
Attending conferences is nice but free recorded sessions are priceless!
Those who know me know I love music. I especially love the underground non-mainstream content. Therefore, my first recommendation is UserGroup.TV. As of December 27th, there are 127 videos tagged as SQL Saturday alone. Shawn goes around to almost every Tech conference he can find and brings his rig and records sessions for the community.
Are you in love with the new pop singles? Wish you could hear them before they hit the radio? If you like your tech like your music than Microsoft Ignite is for you. Every year Microsoft puts on a conference called, Ignite. This conference is usually where Microsoft will break its cutting edge tech. My favorite thing about the conference is that the content is available online for free. Midway through the page, you can search through the massive collection of free recorded sessions.
Next up, is the consistent greatest hits. Almost every session is a banger! This reminds me of my favorite Microsoft Data Platform conference. This is SQLBits and yes, their video content is also available for FREE.
Microsoft made SQL Server 2019 Generally Available this week we want to share some videos and code examples of our favorite new features. Most of these will make your code go faster without any code changes!
We have been testing SQL Server 2019 for months and hope you enjoy these features as much as we do!
I am not sure why but sometimes I am glutting for punishment. Maybe its why I try every backup and restore solution I can get my hands on? While Microsoft has done an amazing job at building the best relational database engine Azure Backup for SQL Server Virtual Machines has some architecture problems. In this post, I will showcase things you need to focus on, problems, and workarounds for your initial run with an Azure Backup for SQL Server VMs.
What’s Azure Backup for SQL Server Virtual Machines (VMs)?
If you take a look at Azure Backup they added functionality for backing up SQL Server databases inside an Azure VM. This seems like a really cool feature. Let’s use the same technology we use to backup our VM’s to also backup our databases. You know the whole one-stop-shop for your disaster recovery needs. Comes with built-in monitoring and it also eliminates the struggle some people have with setting up certificates, encryptions, purging old backups in blob storage, backups and restores from blob storage. It is really nice to also have a similar experience as restoring Azure SQL Databases as well.
Unfortunately, the product doesn’t work as expected at this point in time. I would expect any database backup tool to be able and backup the system databases by default without any customization. Therefore, Last night I setup my first Azure Backup for SQL Server Virtual Machines in the Backup Vault and this morning you can see my results below.
Azure Backup for SQL Server VM’s gets 0/3 system databases backed up by default
Now we will dig into concerns and initial problems with Azure Backup for SQL Server Virtual Machines (VMs).
Automatically Backup New Databases
Having the ability to backup new databases automatically is taken for granted. So much, that I noticed that Azure Backup for SQL Server VM’s will not automatically backup new databases for you. That’s right. Make sure you remember to go in and detect and select your new database every time you add a database or you will not be able to recover.
Azure Backup for SQL Server VM’s has an interesting feature called Autoprotect. This should automatically backup all your databases for you. Unfortunately, this does not work. Yes, I double-checked by enabling autoprotect for a VM and I added a new database. The database didn’t get backed up so I had to manually add the database.
Simple Recovery Problems
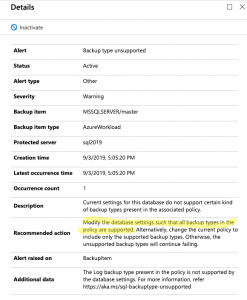
Looking into the failures for my system database backups I noticed something interesting in the log for the master database. It looks like you will get errors with the only SQL Server backup policy created by default. The reason is the policy includes transactional log backups and as you know its impossible to take a transactional log backup if your database utilizes the simple recovery model. Now, most backup tools know how to roll with databases in simple and full recovery.
Looks like Azure Backup for SQL Server VM’s is not one of these tools that easily allow you to mix databases utilizing both simple and full recovery models.
Yup, simple recovery model is no bueno..
So, how do we get around this? It is not too hard. Just create a new backup policy that does not include transactional log backups and assign it to your databases that utilize the simple recovery model.
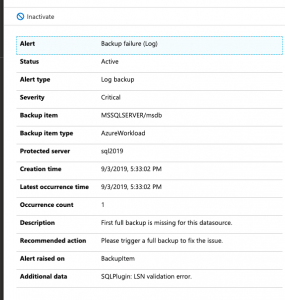
Transactional Log Backup Problems
So, what happens when you try to take a transactional log backup of a database that doesn’t have a full backup? It fails. This is by design. If you try to take a log backup in this scenario with T-SQL it will fail as well. That said, several 3rd Party open source backup solutions like my recommended one can gracefully handle this for you. It can take a full backup instead of the log backup. I have grown to expect this behavior.
Here is what you will see in the logs of Azure Backup for SQL Server VM’s.
You have to force a full backup or wait until the scheduled full backup occurs. Yuck!
So, the workaround here is simple. You can force a backup. This will start the process of allowing your schedule log backups to work as designed. You could also wait until the scheduled full backup runs but know this means you will not have point in time recovery until that full backup runs. There should be an option to perform a full backup instead of a transactional log backup if a full backup does not exist. This would prevent the transactional log scheduled backups from failing.
Things to Know!
Azure Backup for SQL Server VM’s pricing goes off of storage as well as instances of SQL. By default, compression is not used for the SQL Server Backups. You will most likely want to make sure you enable this to save some money.
There are many documented limitations that we didn’t cover in this blog post. Some shocking ones to me are SQL Server Failover Cluster Instances and don’t configure backup for more than 50 databases in one go
Once again it is PASS Summit week in Seattle. This is the biggest event in the world for SQL Server and Microsoft Data Professionals to gather to connect,
Frye First Time Speaker
share and learn.
I will never forget being anxious and scared the first time I gave a presentation at PASS in front of hundreds of people. Therefore, one of my favorite traditions during PASS Summit is to find a first-time speaker at PASS and try to make them at ease by having their friends and peers wear something special during their first presentation.
This year, I couldn’t think of a better person than Jeremy Frye. I have known Jeremy for years. I have been blessed to work with him at RDX. While everyone in the community knows him as the speaker who wears a Pittsburgh Pirates hat at SQL Saturday’s he is an inspiration to me. He is proof that good guys can be successful in this community. He is one of the most humble, kind and helpful people I know. I have been
Dress like Frye Day!
blessed to see him share his knowledge for years and am excited for everyone to do so this week as well. Therefore, to help Jeremy for his first session we will be giving out Pittsburgh Pirates hats to support Jeremy. If you can make Jeremy’s session on “Speed Up Your SSAS Data Refresh with Dynamic Partition Processing” at 11:00 am in room 604 on Friday (I like to call it FryeDay) come on by the RDX booth and ask for a Pirates hat. When you see Jeremy around this week tell him you got this and you cannot wait for his session!
This site uses functional cookies and external scripts to improve your experience. Which cookies and scripts are used and how they impact your visit is specified on the left. You may change your settings at any time. Your choices will not impact your visit.
NOTE: These settings will only apply to the browser and device you are currently using.