Category Archives: Azure

Azure Managed Instance Changing DNS prefix

Azure Managed Instances are provisioned by default with a yourname.uniqueid.databases.windows.net DNS fully qualified domain name (FQDN). Even on your private virtual network you will still have to use this FQDN.

If you want your Azure Managed Instance to connect with your DNS prefix like yourname.domain.com this blog post is for you.

Azure Managed Instance Virtual Network

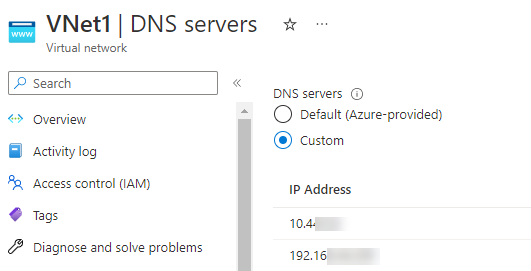
Your first step is to make sure you are either using Azure DNS service or providing one on your own.

In my example we have hybrid setup with Active Directory and DNS Servers in both our virtual network and also on-premises so we will be utilizing an VM in the virtual network to provide DNS.

Azure Virtual Network DNS configuration for your Azure Managed Instance network.
Azure Virtual Network DNS Servers

DNS CNAME Alias Configuration

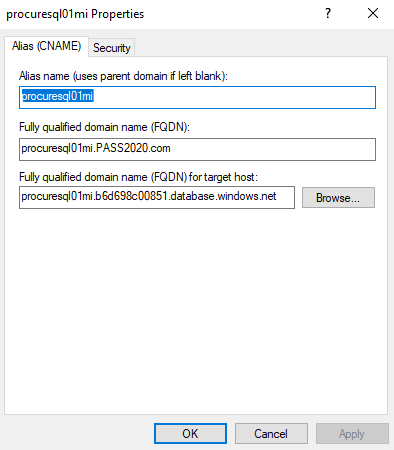
To allow private users to connect utilizing your DNS Zone you need to create a CName alias in DNS. The alias needs to have the same name as your managed instance. In this example, I created a Azure Managed Instance named “procuresql01mi”. Its FQDN is procuresql01mi.b6d698c00851.database.windows.net. The Domain name of my lab is PASS2020.com. I will configure a CName alias so all requests to procuresql01mi.pass2020.com internally will be routed to procuresql01mi.b6d698c00851.database.windows.net.

DNS CName Alias for changing DNS Zone when connecting to a Azure Managed Instance
DNS CName Alias for Azure Managed Instance

Azure Managed Instance DNS Zone Change Wrap Up

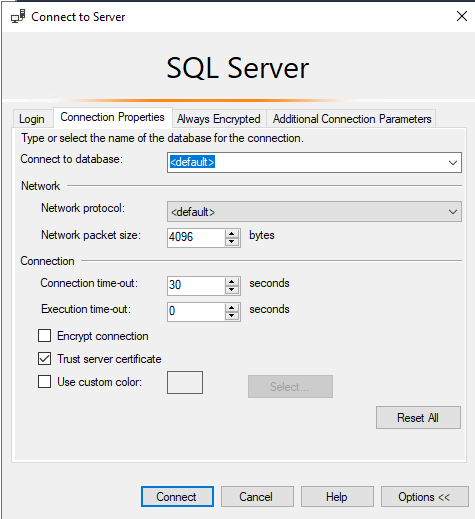
Now all you have to do is connect with the new DNS name used with the alias and you are good to go! If you use Azure AD to connect make sure enable “Trust Server Certificate” on your connection.

rust server certificate for Azure Managed Instance DNS CName Alias
Trust server certificate for Azure Managed Instance DNS CName Alias

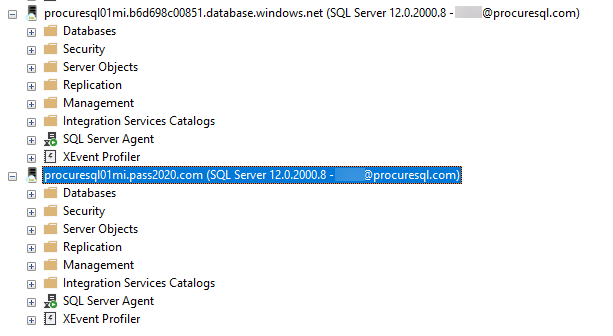
Here you can see both connections via SSMS.

Azure managed instance with your DNS domain
Azure Managed Instance with your DNS domain.

If you have any problems and want some help contact us. Also, if you like these tips subscribe to our newsletter.

Workload Replay for Azure SQL Database and Amazon RDS

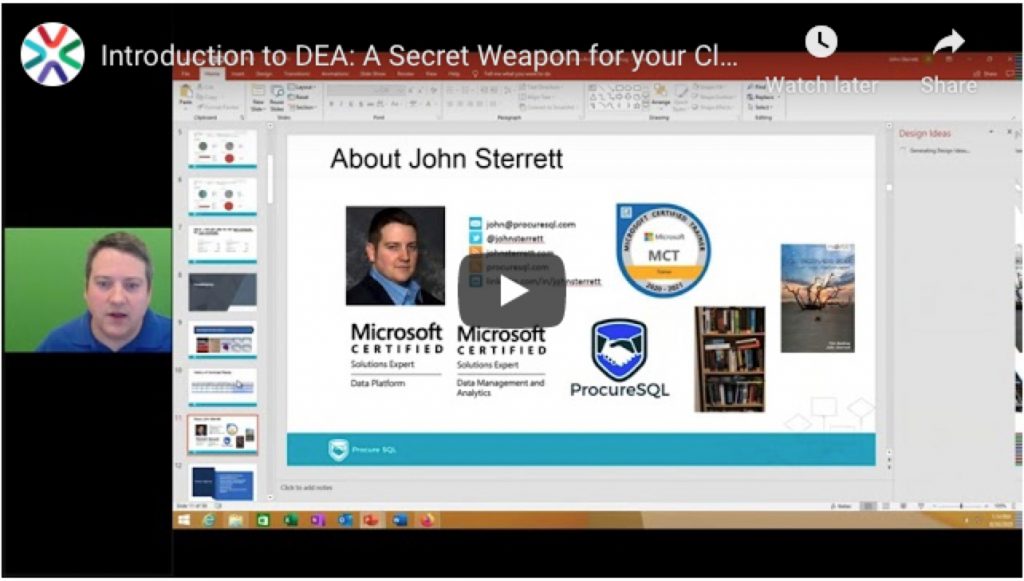
Want to make sure you don’t have errors, validate performance, and save money while making changes with Azure SQL Database, Azure SQL Managed Instance, SQL Server RDS in Amazon AWS? In this video, you will learn how to use the Data Experimentation Assistant to perform workload replay and compare your on-premise or cloud SQL Server workloads on-demand.

Replay Workloads is your Secret Weapon to being a Rockstar!
Replaying Workloads is your Secret Weapon to being a Rockstar!

Recommend Links

Import Databases to Azure SQL Database

I recently spoke at a conference and was asked what is the easiest way to import databases to Azure SQL Database. Therefore, I wanted to share how I do this with DBATools.io. You can use the same code to just export if you need a local copy of an Azure SQL database as well.

Import-Module dbatools -Force
<# Variables #>
$BackupPath = "C:\Demo\AzureSQL\Bacpac" #folder location for backups
$SourceInstance = "sql2019\sql2016"
$DBName = "AdventureWorksLT2012"
$AzureDestInstance = "procuresqlsc.database.windows.net"
$DBNameDest = $DBName

<# backpac options for import and export #>
$option = New-DbaDacOption -Type Bacpac -Action Export
$option.CommandTimeout = 0

$option2 = New-DbaDacOption -Type Bacpac -Action Publish
$option2.CommandTimeout = 0

<#  
The following assums Azure SQL Database exists and is empty 
Azure will create database by default if it doesn't exist 
#>
$bacpac = Export-DbaDacPackage -Type Bacpac -DacOption $option -Path `
$BackupPath -SqlInstance $SourceInstance -Database $DBName 
Publish-DbaDacPackage -Type Bacpac -SqlInstance `
$AzureDestInstance -Database $DBNameDest -Path $bacpac.path `
 -DacOption $option2 -SqlCredential username

What Is my Performance Tier?

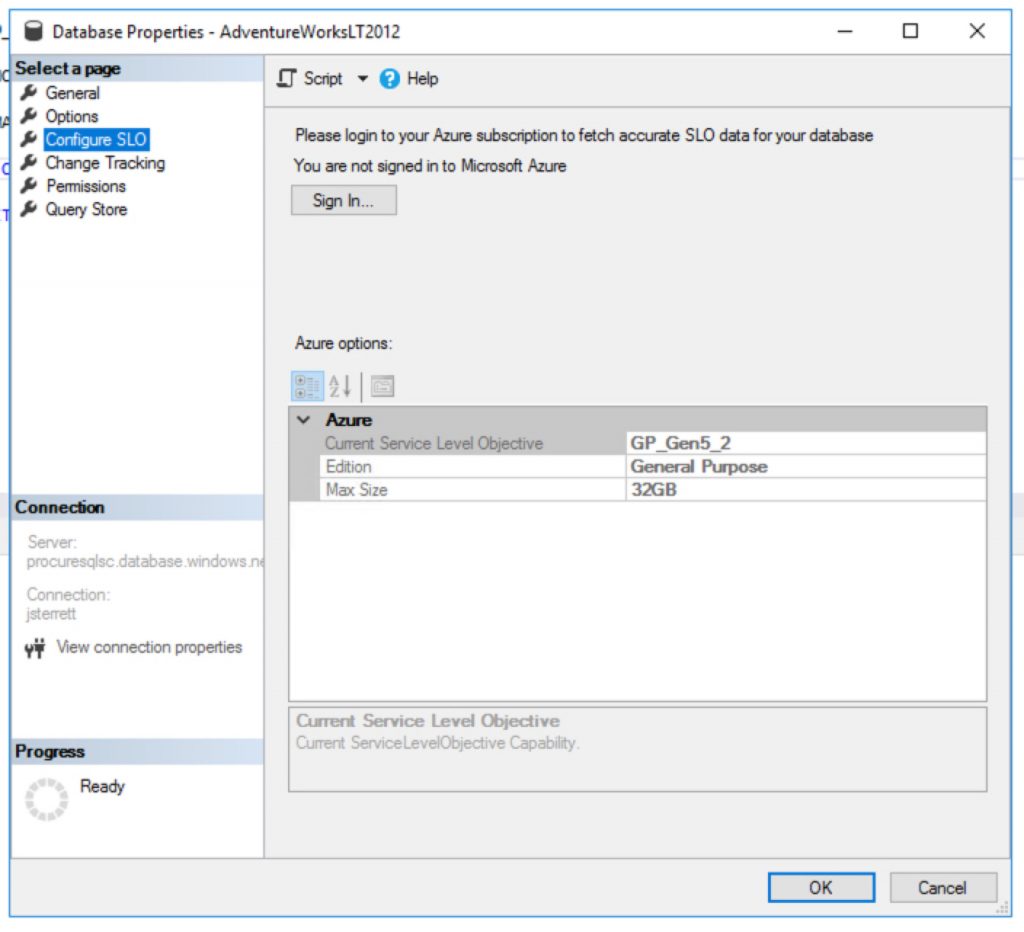
Great question, as of 3/3/2020 if the database in Azure SQL Database does not exist then it will be created. When its created the following database uses the default performance tier. This is General Purpose (Gen5) with 2 vCores.

Default performance tier for a new Azure SQL Database costs $371.87 per month.
The default cost of a new Azure SQL Database is 371.87 per month.

How to create cheaper databases

Great question, you can import databases to Azure SQL Database cheaper using PowerShell. It is as simple as using the Azure PowerShell Module. The following example below I use my existing Azure SQL Database server and I end up creating a new database with the “S0” tier.

<# 
Install Azure Powershell module requires local admin
Install-Module -Name Az -AllowClobber -Scope AllUsers
#>

Import-Module Az -Force
$RGName = "<Your Existing Resource Group>"
$ServerName = "<Your Azure SQL Database Server>"
$Tenant = "<Add Tenant ID>"
$Subscription = "<Add your Subscription ID>"

Connect-AzAccount -Tenant $Tenant  -SubscriptionId $Subscription
$server = Get-AzSqlServer -ResourceGroupName $RGName -ServerName  $ServerName

$db = New-AzSqlDatabase -ResourceGroupName $RGName `
-ServerName $server.ServerName -DatabaseName $DBName `
-RequestedServiceObjectiveName "S0"

Your Homework Assignment

You got all the nuts and bolts to generate a script that can migrate all your databases on an instance. Then you can import databases to Azure SQL Database in one loop.

Need Help Moving to Azure?

Let us help you! Schedule a free 30-minute chat to see if we can point you the right direction. Take advantage of our free resources too.

If you liked this blog post signup for our free newsletter!

Allow users to start/stop Azure VMs

Today I wanted to cover how you can grant the least privilege required to stop, start or restart an Azure VM. This is also a fun great example of how you can create custom Azure Security Roles too. That’s right, we are killing two birds with one stone today.

Why Should you create a custom Role?

Where possible I like to grant security towards resource groups. Therefore, let’s assume we got multiple VM’s built for the developer group to do some testing. You want to grant people access to start, restart or stop any VM in that group. We can then grant access to the resource group to our custom role. As VMs come in and out of the resource group they would inherit our custom group.

Now, you might be wondering why don’t I just give them the “Contributor” role or the “Virtual Machine Contributor” role and be on our way? Well, if you were to do this on a resource group you just gave access to create VM’s and a whole lot more.

Least privileged roles are your best friend. Today, you will see they are also not that hard to create either.

How do we create custom roles?

Great question, first you need to identify what tasks do we need the role to complete. In our case, you have to be able to see a VM in order to take any action against the VM. Then we want to start, stop (deallocate) and restart the VM. Digging through IAM. I found the following security options.

 "Microsoft.Compute/*/read",
 "Microsoft.Compute/virtualMachines/start/action",
 "Microsoft.Compute/virtualMachines/restart/action",
 "Microsoft.Compute/virtualMachines/deallocate/action"

Now, we can create our custom JSON text file that we will then import using Azure CLI. Below you will find a sample JSON file to build our custom security role. You will need to add your subscription id(s). You can also change your name and description you would see in the Azure Portal.

  "Name": "VM Operator",
      "IsCustom": true,
      "Description": "Can start, restart and stop (deallocate) virtual machines.",
      "Actions": [
        "Microsoft.Compute/*/read",
        "Microsoft.Compute/virtualMachines/start/action",
        "Microsoft.Compute/virtualMachines/restart/action",
        "Microsoft.Compute/virtualMachines/deallocate/action"
      ],
      "NotActions": [


      ],
      "AssignableScopes": [
        "/subscriptions/<Subscription ID Goes Here>"
      ]
    }

How to Import Custom Security

Now that we are ready to go with our custom security role in a JSON file. We can then utilize Azure CLI to log in to the tenant and import our security role. First, we will log in to Azure with CLI as shown below.

az login --username <myEmailAddress> -t <customerTenantId-or-Domain>

Now we will load our saved JSON file. After a few minutes, we should then see our new security role in the Azure portal.

az role definition create --role-definition IAMRole-VMOperator.json

Now you can grant access to your custom role just like you would with any other role in Azure.

Azure Backup for SQL Server VMs

I am not sure why but sometimes I am glutting for punishment. Maybe its why I try every backup and restore solution I can get my hands on? While Microsoft has done an amazing job at building the best relational database engine Azure Backup for SQL Server Virtual Machines has some architecture problems. In this post, I will showcase things you need to focus on, problems, and workarounds for your initial run with an Azure Backup for SQL Server VMs.

What’s Azure Backup for SQL Server Virtual Machines (VMs)?

If you take a look at Azure Backup they added functionality for backing up SQL Server databases inside an Azure VM. This seems like a really cool feature. Let’s use the same technology we use to backup our VM’s to also backup our databases. You know the whole one-stop-shop for your disaster recovery needs. Comes with built-in monitoring and it also eliminates the struggle some people have with setting up certificates, encryptions, purging old backups in blob storage, backups and restores from blob storage. It is really nice to also have a similar experience as restoring Azure SQL Databases as well.

Unfortunately, the product doesn’t work as expected at this point in time. I would expect any database backup tool to be able and backup the system databases by default without any customization. Therefore, Last night I setup my first Azure Backup for SQL Server Virtual Machines in the Backup Vault and this morning you can see my results below.

Azure Backup for SQL Server VM’s gets 0/3 system databases backed up by default

Now we will dig into concerns and initial problems with Azure Backup for SQL Server Virtual Machines (VMs).

Automatically Backup New Databases

Having the ability to backup new databases automatically is taken for granted. So much, that I noticed that Azure Backup for SQL Server VM’s will not automatically backup new databases for you. That’s right. Make sure you remember to go in and detect and select your new database every time you add a database or you will not be able to recover.

Azure Backup for SQL Server VM’s has an interesting feature called Autoprotect. This should automatically backup all your databases for you. Unfortunately, this does not work. Yes, I double-checked by enabling autoprotect for a VM and I added a new database. The database didn’t get backed up so I had to manually add the database.

Simple Recovery Problems

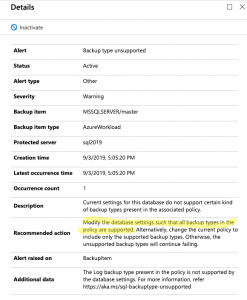
Looking into the failures for my system database backups I noticed something interesting in the log for the master database. It looks like you will get errors with the only SQL Server backup policy created by default. The reason is the policy includes transactional log backups and as you know its impossible to take a transactional log backup if your database utilizes the simple recovery model. Now, most backup tools know how to roll with databases in simple and full recovery.

Looks like Azure Backup for SQL Server VM’s is not one of these tools that easily allow you to mix databases utilizing both simple and full recovery models.

Yup.. Simple recovery model is no bueno..
Yup, simple recovery model is no bueno..

So, how do we get around this? It is not too hard. Just create a new backup policy that does not include transactional log backups and assign it to your databases that utilize the simple recovery model.

Transactional Log Backup Problems

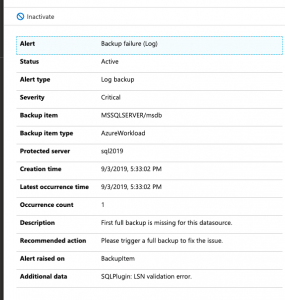
So, what happens when you try to take a transactional log backup of a database that doesn’t have a full backup? It fails. This is by design. If you try to take a log backup in this scenario with T-SQL it will fail as well. That said, several 3rd Party open source backup solutions like my recommended one can gracefully handle this for you. It can take a full backup instead of the log backup. I have grown to expect this behavior.

Here is what you will see in the logs of Azure Backup for SQL Server VM’s.

Log backups without a full backup fail. You have to force a full backup
You have to force a full backup or wait until the scheduled full backup occurs. Yuck!

So, the workaround here is simple. You can force a backup. This will start the process of allowing your schedule log backups to work as designed. You could also wait until the scheduled full backup runs but know this means you will not have point in time recovery until that full backup runs. There should be an option to perform a full backup instead of a transactional log backup if a full backup does not exist. This would prevent the transactional log scheduled backups from failing.

Things to Know!

Azure Backup for SQL Server VM’s pricing goes off of storage as well as instances of SQL. By default, compression is not used for the SQL Server Backups. You will most likely want to make sure you enable this to save some money.

Azure Backup for SQL Server VMs has a good amount of documentation for troubleshooting common problems.

There are many documented limitations that we didn’t cover in this blog post. Some shocking ones to me are SQL Server Failover Cluster Instances and don’t configure backup for more than 50 databases in one go

Talking about Migrating to Azure SQL Database at #MSIgnite this week

Speaking on Migrating to Azure SQL Database at Ignite 2017

Speaking on Migrating to Azure SQL Database at Ignite 2017

This week I will have two talks on migrating existing database to Azure SQL Databases at Microsoft Ignite.  If you are there and curious about migrating your existing databases we would love to talk with you.

If you are attending or not attending you can use our Migration to Azure SQL Database Resource Cheat Sheet

My talk is Successfully Migrating Existing Databases to Azure SQL Databases.

Monday 4:35 pm in Hyatt Recency Theater – Level One

Wednesday 1:35 pm OCCC South – Expo Theater #8


Benchmark Azure SQL Database Wait Stats

Today, I want to focus on how we can monitor wait statistics in an Azure SQL Database.  In the past, I blogged about how you should benchmark wait stats with the box product.  This process will give you misleading data in Azure SQL Database.  You will want to focus on wait stats that are specific to your database as you are using shared resources in Azure SQL Databases.

Finding Database Waits Statistics

Query we are talking to you!

Query we are talking to you!

With an instance of SQL Server regardless of using IaaS or on-premise, you would want to focus on all the waits that are occurring in your instance because the resources are dedicated to you.

In database as a service (DaaS), Microsoft gives you a special DMV that makes troubleshooting performance in Azure easier than any other competitor.  This feature is the dm_db_wait_stats DMV.  This DMV allows us specifically to get the details behind why our queries are waiting within our database and not the shared environment.  Once again it is worth repeating, wait statistics for our database in a shared environment.

The following is the script is a stored procedure I use to collect wait statistics for my Azure SQL Databases.  I hope it is a helpful benchmarking tool for you when you need to troubleshoot performance in Azure SQL Database.

The Good Stuff

/***************************************************************************
    Author : John Sterrett, Procure SQL LLC

    File:     AzureSQLDB_WaitStats.sql

    Summary:  The following code creates a stored procedure that can be used
                 to collect wait statistics for an Azure SQL Database.
                        
    Date:     August 2016

    Version:  Azure SQL Database V12 
  
  ---------------------------------------------------------------------------
  
  For more scripts and sample code, check out 
    https://johnsterrett.com

  THIS CODE AND INFORMATION ARE PROVIDED "AS IS" WITHOUT WARRANTY OF 
  ANY KIND, EITHER EXPRESSED OR IMPLIED, INCLUDING BUT NOT LIMITED 
  TO THE IMPLIED WARRANTIES OF MERCHANTABILITY AND/OR FITNESS FOR A
  PARTICULAR PURPOSE.
************************************************************************/

If NOT EXISTS (Select 1 from sys.schemas where name = N'Waits')
        execute sp_executesql @stmt = N'CREATE SCHEMA [Waits] AUTHORIZATION [dbo];'
GO


CREATE TABLE Waits.WaitStats (CaptureDataID bigint, WaitType varchar(200), wait_S decimal(20,5), Resource_S decimal (20,5), Signal_S decimal (20,5), WaitCount bigint, Avg_Wait_S numeric(10, 6), Avg_Resource_S numeric(10, 6),Avg_Signal_S numeric(10, 6), CaptureDate datetime)
CREATE TABLE Waits.BenignWaits (WaitType varchar(200))
CREATE TABLE Waits.CaptureData (
ID bigint identity PRIMARY KEY,
StartTime datetime,
EndTime datetime,
ServerName varchar(500),
PullPeriod int
)

INSERT INTO Waits.BenignWaits (WaitType)
VALUES ('CLR_SEMAPHORE')
INSERT INTO Waits.BenignWaits (WaitType)
VALUES ('LAZYWRITER_SLEEP')
INSERT INTO Waits.BenignWaits (WaitType)
VALUES  ('RESOURCE_QUEUE')
INSERT INTO Waits.BenignWaits (WaitType)
VALUES ('SLEEP_TASK')
INSERT INTO Waits.BenignWaits (WaitType)
VALUES ('SLEEP_SYSTEMTASK')
INSERT INTO Waits.BenignWaits (WaitType)
VALUES ('SQLTRACE_BUFFER_FLUSH')
INSERT INTO Waits.BenignWaits (WaitType)
VALUES  ('WAITFOR')
INSERT INTO Waits.BenignWaits (WaitType)
VALUES ('LOGMGR_QUEUE')
INSERT INTO Waits.BenignWaits (WaitType)
VALUES ('CHECKPOINT_QUEUE')
INSERT INTO Waits.BenignWaits (WaitType)
VALUES ('REQUEST_FOR_DEADLOCK_SEARCH')
INSERT INTO Waits.BenignWaits (WaitType)
VALUES ('XE_TIMER_EVENT')
INSERT INTO Waits.BenignWaits (WaitType)
VALUES  ('BROKER_TO_FLUSH')
INSERT INTO Waits.BenignWaits (WaitType)
VALUES ('BROKER_TASK_STOP')
INSERT INTO Waits.BenignWaits (WaitType)
VALUES ('CLR_MANUAL_EVENT')
INSERT INTO Waits.BenignWaits (WaitType)
VALUES ('CLR_AUTO_EVENT')
INSERT INTO Waits.BenignWaits (WaitType)
VALUES ('DISPATCHER_QUEUE_SEMAPHORE')
INSERT INTO Waits.BenignWaits (WaitType)
VALUES ('FT_IFTS_SCHEDULER_IDLE_WAIT')
INSERT INTO Waits.BenignWaits (WaitType)
VALUES ('XE_DISPATCHER_WAIT')
INSERT INTO Waits.BenignWaits (WaitType)
VALUES ('XE_DISPATCHER_JOIN')
INSERT INTO Waits.BenignWaits (WaitType)
VALUES ('BROKER_EVENTHANDLER')
INSERT INTO Waits.BenignWaits (WaitType)
VALUES ('TRACEWRITE')
INSERT INTO Waits.BenignWaits (WaitType)
VALUES ('FT_IFTSHC_MUTEX')
INSERT INTO Waits.BenignWaits (WaitType)
VALUES ('SQLTRACE_INCREMENTAL_FLUSH_SLEEP')
INSERT INTO Waits.BenignWaits (WaitType)
VALUES ('BROKER_RECEIVE_WAITFOR')
INSERT INTO Waits.BenignWaits (WaitType)
VALUES ('ONDEMAND_TASK_QUEUE')
INSERT INTO Waits.BenignWaits (WaitType)
VALUES ('DBMIRROR_EVENTS_QUEUE')
INSERT INTO Waits.BenignWaits (WaitType)
VALUES ('DBMIRRORING_CMD')
INSERT INTO Waits.BenignWaits (WaitType)
VALUES ('BROKER_TRANSMITTER')
INSERT INTO Waits.BenignWaits (WaitType)
VALUES ('SQLTRACE_WAIT_ENTRIES')
INSERT INTO Waits.BenignWaits (WaitType)
VALUES ('SLEEP_BPOOL_FLUSH')
INSERT INTO Waits.BenignWaits (WaitType)
VALUES ('SQLTRACE_LOCK')
INSERT INTO Waits.BenignWaits (WaitType)
VALUES ('DIRTY_PAGE_POLL')
INSERT INTO Waits.BenignWaits (WaitType)
VALUES ('SP_SERVER_DIAGNOSTICS_SLEEP')
INSERT INTO Waits.BenignWaits (WaitType)
VALUES ('HADR_FILESTREAM_IOMGR_IOCOMPLETION')
INSERT INTO Waits.BenignWaits (WaitType)
VALUES ('HADR_WORK_QUEUE')

insert Waits.BenignWaits (WaitType) VALUES ('QDS_CLEANUP_STALE_QUERIES_TASK_MAIN_LOOP_SLEEP');
insert Waits.BenignWaits (WaitType) VALUES ('QDS_PERSIST_TASK_MAIN_LOOP_SLEEP');
GO

--DROP PROCEDURE Waits.GetWaitStats
CREATE PROCEDURE Waits.GetWaitStats 
    @WaitTimeSec INT = 60,
    @StopTime DATETIME = NULL
AS
BEGIN
    DECLARE @CaptureDataID int
    /* Create temp tables to capture wait stats to compare */
    IF OBJECT_ID('tempdb..#WaitStatsBench') IS NOT NULL
        DROP TABLE #WaitStatsBench
    IF OBJECT_ID('tempdb..#WaitStatsFinal') IS NOT NULL
        DROP TABLE #WaitStatsFinal

    CREATE TABLE #WaitStatsBench (WaitType varchar(200), wait_S decimal(20,5), Resource_S decimal (20,5), Signal_S decimal (20,5), WaitCount bigint)
    CREATE TABLE #WaitStatsFinal (WaitType varchar(200), wait_S decimal(20,5), Resource_S decimal (20,5), Signal_S decimal (20,5), WaitCount bigint)

    DECLARE @ServerName varchar(300)
    SELECT @ServerName = convert(nvarchar(128), serverproperty('servername'))
    
    /* Insert master record for capture data */
    INSERT INTO Waits.CaptureData (StartTime, EndTime, ServerName,PullPeriod)
    VALUES (GETDATE(), NULL, @ServerName, @WaitTimeSec)
    
    SELECT @CaptureDataID = SCOPE_IDENTITY()
     
/* Loop through until time expires  */
    IF @StopTime IS NULL
        SET @StopTime = DATEADD(hh, 1, getdate())
    WHILE GETDATE() < @StopTime
    BEGIN

        /* Get baseline */
        
        INSERT INTO #WaitStatsBench (WaitType, wait_S, Resource_S, Signal_S, WaitCount)
        SELECT
                wait_type,
                wait_time_ms / 1000.0 AS WaitS,
                (wait_time_ms - signal_wait_time_ms) / 1000.0 AS ResourceS,
                signal_wait_time_ms / 1000.0 AS SignalS,
                waiting_tasks_count AS WaitCount
            FROM sys.dm_db_wait_stats
            WHERE wait_time_ms > 0.01 
            AND wait_type NOT IN ( SELECT WaitType FROM Waits.BenignWaits)
        

        /* Wait a few minutes and get final snapshot */
        WAITFOR DELAY @WaitTimeSec;

        INSERT INTO #WaitStatsFinal (WaitType, wait_S, Resource_S, Signal_S, WaitCount)
        SELECT
                wait_type,
                wait_time_ms / 1000.0 AS WaitS,
                (wait_time_ms - signal_wait_time_ms) / 1000.0 AS ResourceS,
                signal_wait_time_ms / 1000.0 AS SignalS,
                waiting_tasks_count AS WaitCount
            FROM sys.dm_db_wait_stats
            WHERE wait_time_ms > 0.01
            AND wait_type NOT IN ( SELECT WaitType FROM Waits.BenignWaits)
        
        DECLARE @CaptureTime datetime 
        SET @CaptureTime = getdate()

        INSERT INTO Waits.WaitStats (CaptureDataID, WaitType, Wait_S, Resource_S, Signal_S, WaitCount, Avg_Wait_S, Avg_Resource_S,Avg_Signal_S, CaptureDate)
        SELECT  @CaptureDataID,
            f.WaitType,
            f.wait_S - b.wait_S as Wait_S,
            f.Resource_S - b.Resource_S as Resource_S,
            f.Signal_S - b.Signal_S as Signal_S,
            f.WaitCount - b.WaitCount as WaitCounts,
            CAST(CASE WHEN f.WaitCount - b.WaitCount = 0 THEN 0 ELSE (f.wait_S - b.wait_S) / (f.WaitCount - b.WaitCount) END AS numeric(10, 6))AS Avg_Wait_S,
            CAST(CASE WHEN f.WaitCount - b.WaitCount = 0 THEN 0 ELSE (f.Resource_S - b.Resource_S) / (f.WaitCount - b.WaitCount) END AS numeric(10, 6))AS Avg_Resource_S,
            CAST(CASE WHEN f.WaitCount - b.WaitCount = 0 THEN 0 ELSE (f.Signal_S - b.Signal_S) / (f.WaitCount - b.WaitCount) END AS numeric(10, 6))AS Avg_Signal_S,
            @CaptureTime
        FROM #WaitStatsFinal f
        LEFT JOIN #WaitStatsBench b ON (f.WaitType = b.WaitType)
        WHERE (f.wait_S - b.wait_S) > 0.0 -- Added to not record zero waits in a time interval.
        
        TRUNCATE TABLE #WaitStatsBench
        TRUNCATE TABLE #WaitStatsFinal
 END -- END of WHILE
 
 /* Update Capture Data meta-data to include end time */
 UPDATE Waits.CaptureData
 SET EndTime = GETDATE()
 WHERE ID = @CaptureDataID
END

Special Wait Statistics Types

The following are wait statistics you will want to focus on specifically in Azure SQL Database.  If you made it this far, I strongly encourage you to read how DTU is measured.  That blog post will help you understand exactly why these waits can be signs of DTU pressure.

IO_QUEUE_LIMIT :  Occurs when the asynchronous IO queue for the Azure SQL Database has too many IOs pending. Tasks trying to issue another IO are blocked on this wait type until the number of pending IOs drop below the threshold. The threshold is proportional to the DTUs assigned to the database.

LOG_RATE_GOVERNOR :  Occurs when DB is waiting for quota to write to the log.  Yes,  Azure SQL Database is capping your transactional log writes to adhere to DTU.

SOS_SCHEDULER_YIELD: This occurs when a task voluntarily yields the scheduler for other tasks to execute. During this wait, the task is waiting in the runnable queue to get a scheduler to run.  If your DTU calculation is based on CPU usage you will typically see these waits.

Want More Azure Articles?

If you enjoyed this blog post I think you will also enjoy the following related blog posts.

John Sterrett is a Microsoft Data Platform MVP and a Group Principal for Procure SQL. If you need any help with your on-premise or cloud SQL Server databases, John would love to chat with you. You can contact him directly at john AT ProcureSQL dot com or here.

Photo Credit:  
Calculating DTU in Azure SQL Database

A few months ago, I posted a question over on ask.sqlservercentral.com.  In a nutshell, it was how do you measure DTU? How could you pull the data shown in the Azure Portal graphs with T-SQL?  No one answered, so this motivated me get off my butt and answer my question.  In doing so, I wanted to share the results with all my readers as well.

I started thinking like a detective.  If I was DTU how would I want to be found with T-SQL?

It was the Azure Portal in the Query Store

It was the Azure Portal in the Query Store

Knowing, that both “sys.dm_db_resource_stats” and “sys.resource_stats” holds data that is used to calculate DTU. I decided to leverage Query Store on an Azure SQL Database to see if I could quickly see how DTU is calculated. Behold, I was right.


Query Store

How DTU is calculated in Azure Portal

The Secret Sauce

The whole query is below. Right now, let’s just focus on the secret sauce. The secret sauce is how DTU percentage gets calculated.  In a nutshell, the maximum of CPU, Data IO, Log Write Percent determine your DTU percentage.  What does this mean to you? Your max consumer limits you. So, you can be using 1% of your IO but still be slowed down because CPU could be your max consumer resource.

(SELECT MAX(v) FROM (VALUES (avg_cpu_percent), (avg_data_io_percent), (avg_log_write_percent)) AS value(v)), 0) as dtu_consumption_percent

DTU Calculating Query

SELECT ((CONVERT(BIGINT, DATEDIFF(day, 0, [end_time])) * 24 * 3600 + DATEDIFF(second, DATEADD(day, DATEDIFF(day, 0, [end_time]), 0), [end_time])) / @timeGrain) * @timeGrain as start_time_interval
                , MAX(cpu_percent) as cpu_percent
                , MAX(physical_data_read_percent) as physical_data_read_percent
                , MAX(log_write_percent) as log_write_percent
                , MAX(memory_usage_percent) as memory_usage_percent
                , MAX(xtp_storage_percent) as xtp_storage_percent
                , MAX(dtu_consumption_percent) as dtu_consumption_percent
                , MAX(workers_percent) as workers_percent
                , MAX(sessions_percent) as sessions_percent
                , MAX(dtu_limit) as dtu_limit
                , MAX(dtu_used) as dtu_used
             FROM
                 (SELECT
                     end_time
                    , ISNULL(avg_cpu_percent, 0) as cpu_percent
                    , ISNULL(avg_data_io_percent, 0) as physical_data_read_percent
                    , ISNULL(avg_log_write_percent, 0) as log_write_percent
                    , ISNULL(avg_memory_usage_percent, 0) as [memory_usage_percent]
                    , ISNULL(xtp_storage_percent, 0) as xtp_storage_percent
                    , ISNULL((SELECT MAX(v) FROM (VALUES (avg_cpu_percent), (avg_data_io_percent), (avg_log_write_percent)) AS value(v)), 0) as dtu_consumption_percent
                    , ISNULL(max_worker_percent, 0) as workers_percent
                    , ISNULL(max_session_percent, 0) as sessions_percent
                    , ISNULL(dtu_limit, 0) as dtu_limit
                    , ISNULL(dtu_limit, 0) * ISNULL((SELECT MAX(v) FROM (VALUES (avg_cpu_percent), (avg_data_io_percent), (avg_log_write_percent)) AS value(v)), 0) / 100.0 as dtu_used
                 FROM sys.dm_db_resource_stats 
                 WHERE [end_time] >= @startTime AND [end_time] <= @endTime
                 ) t
             GROUP BY ((CONVERT(BIGINT, DATEDIFF(day, 0, [end_time])) * 24 * 3600 + DATEDIFF(second, DATEADD(day, DATEDIFF(day, 0, [end_time]), 0), [end_time])) / @timeGrain) * @timeGrain

A Future Blog Post

Now that we can calculate DTU we could trend this data and automatically make changes like moving up and down from the current performance tier.  I would love to wrap this into an Azure SQL Database Alert but a process in PowerShell might be a great starting point.

John Sterrett is a Microsoft Data Platform MVP and a Group Principal for Procure SQL. If you need any help with your on-premise or cloud SQL Server databases, he would love to chat with you. You can contact him directly at john AT ProcureSQL dot com or here.

Azure SQL Database Live Migrations

Unfortunately, with Azure SQL Database you are not able to take an existing SQL Server Backup and restore it on an Azure SQL Database server.  We are talking about Microsoft’s database as a service (DaaS)  offering, not Azure VMs also known as infrastructure as a service (IaaS).  The only current way to migrate an existing database is to move the schema and the data, period. We have some good tools that can make this seamless, especially with smaller databases and outage windows. You can easily use SQLPackage.exe (My recommended tool), SSMS Wizard , or import/export bacpacs.

Migrating Existing Databases to Azure SQL Database

Migrating Existing Databases to Azure SQL Database

This is great, except for the case I want to talk about today. What if you need to do a live migration with as little downtime (business wants no downtime) as possible with bigger databases. For example, say and existing 50 GB to 500GB database? Your only, option today is a good old friend of mine called transactional replication. You see, you can configure transactional replication and have the snapshot occur and all data in your current production system can be syncing live with your Azure SQL Database until it’s time to cutover which will make your cutover downtime as short as possible.

Below I will give you step by step instructions on how you can configure your subscriber. This would be your Azure SQL Database. The publisher would be your existing production database which could either be on-premise or an Azure VM.

Prereqs

To make this blog post as consumable as possible, we will assume a few prereqs have been completed.  Links in the reference section are provided in case you might want help with the following prereqs.

  • Current production database has a primary key on all tables that need to be migrated. This is a requirment for transactional replication.
  • A new empty Azure SQL Database exists.
  • Azure SQL Database Firewall includes your distributor SQL Server (more in this below)
  • You have an SQL Authenticated Account configured for your Azure SQL Database
  • Publication currently exists

Step One:

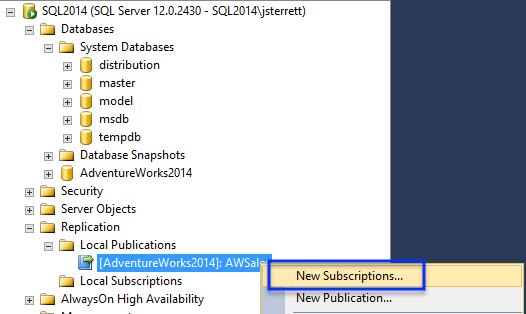
Below we will start creating our subscription by utilizing an existing publication. For this article, we will use AdventureWorks. We start by creating a new subscription. I assume you have an existing publication on your primary server and that it is configured. We will use the same server for the distribution agent and the distribution database.

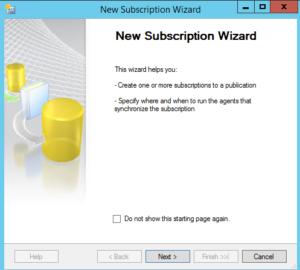
Create Subscription Azure DB

Next, we will walk through the wizard.
17_CreateSubscriptionAzureDB


Step Two:

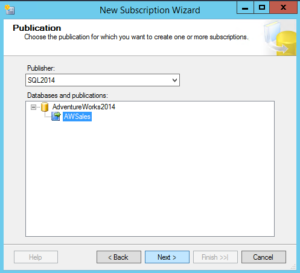
Select the publication you would want to use to add the new subscriber to use the empty Azure SQL Database. Remember in this case, were going to use this subscriber to migrate the schema and data to a new Azure SQL Database.

18_CreateSubscriptionAzureDB

Step Three:

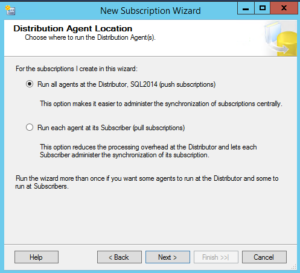
Now, you will need to configure the distribution properties. With Azure SQL Databases you will have no access to the OS and only the database. Therefore, you will need to create a push subscription. A push subscription is a nice way of saying all the agents that initialize the data sync, capture and send data are configured on the distributor server.

19_CreateSubscriberAzureDB

NOTE: If you plan on having a lot of publications it is recommended to use an individual SQL Server to isolate your distribution databases. 

Step Four:

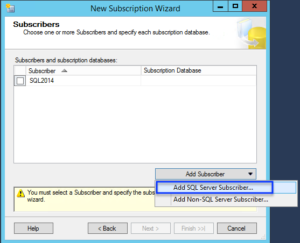
Now we will select where our subscriber will reside. The subscriber will be the Azure SQL Database that we are migrating too.

20_CreateSubscriberAzureDB

21_CreateSubscriberAzureDB_Adjusted

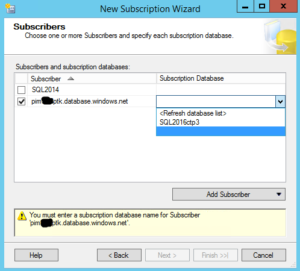
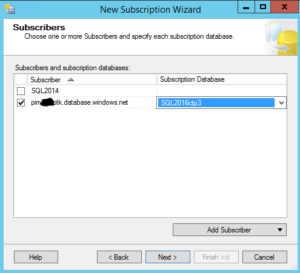
Now you will be able to select your database. In this case, we are going to use SQL 2016ctp3 database. This is an empty database that was created in the prereqs.

22_CreateSubscriptionAzureDB_adjusted

NOTE: Your publisher and distribution SQL Servers must be on a supported version of SQL Server to have Azure SQL Database as a subscriber or you will not be able to select your Azure SQL Database Server as a new subscriber. Trust me, I learned this initially the hard way.

23_CreateSubscriptionAzureDB_altered

Step Five:

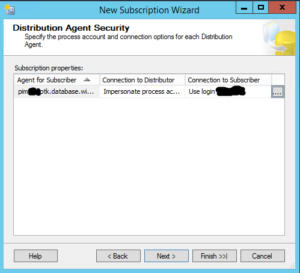
Now that our subscriber database is selected we need to define how we are going to connect to our subscriber.

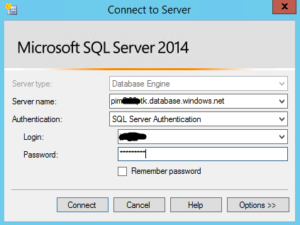
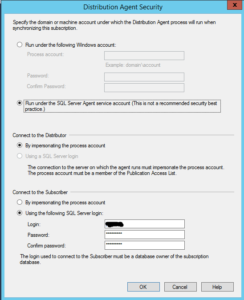
We will use SQL Server authentication using an account on your Azure SQL Database that will allow you to create the schema and move the data. You will also need to update your SQL Azure firewall to include your existing distribution SQL Server as mentioned in the prereq section.

For simplicity of this guide, we are going to run the distribution agent under the SQL Agent Service account. Ideally, you would want a separate account that only had the security needed for transactional replication.

24_CreateSubscription_DistributionSettings_Altered

25_CreateSubscriptionAzureDB_altered

Next, we will define how often we will synchronize the data. We will select to run continuously. You could also have this run on a schedule as well.

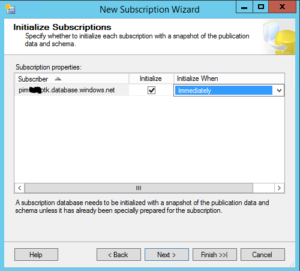
27_CreateSubscription_AzureDB_altered

Now we select when to initialize the subscription. Initializing the subscription will execute the snapshot agent (process) that will initialize building the schema and bulk inserting data from the publisher to the distributor and then this data will be sent to the subscriber.

NOTE: The snapshot process will require a schema lock on the publisher database so make sure you initialize at a time when the schema lock is appropriate. In this article, we will initialize immediately.

Step Six:

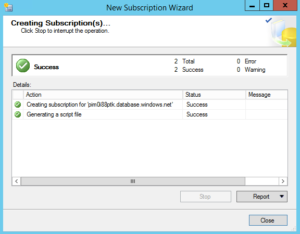
Now the hard work is done. We will go through the final processes of adding the new subscription with the wizard provided with SSMS.

28_CreateSubscription_AzureDB

29_CreateSubscriptionAzureDB_Altered

30_CreateSubscriber_AzureDB

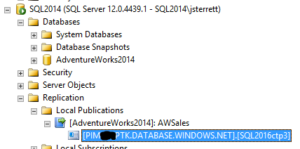
Finally, once the New Subscription Wizard is successful, you will see your subscription like shown in the image below. You can then monitor the synchronization just like you would with any on-prem transactional replication configuration.

31_CreateSubscription_Review_ALTERED

Conclusion

Configuring an Azure SQL Database as a subscriber is a lot easier than many IT Professionals would initially think. It’s also the best current option to reduce downtime required to synchronize data during a migration of an existing database. The data sync is done in advance and data changes will be kept in sync.

Once data is synchronized, you can stop access to the current production server and remove the subscriber and let the users access the new Azure SQL Database.

Keep in mind, as of the time of publishing this blog post an Azure SQL Database can only be a subscriber and not a publisher in transactional replication. What does this mean to you? Do performance and acceptance testing because you would have to generate a bacpac and export it and import it if you decide to move away from Azure SQL Database.

Additional Reference

John Sterrett is a Microsoft Data Platform MVP and a Group Principal for Procure SQL. If you need any help with your on-premise or cloud SQL Server databases, he would love to chat with you. You can contact him directly at john AT ProcureSQL dot com or here.